How to create jquery ajax success post

Jquery is the most popular JavaScript library, and makes easy for our work web development projects, there have a lots of useful functions and tricks of Jquery such as form validation, onchange, click trigger and hiding the elements and especially in Ajax makes short and easy.
I try pure Ajax before and the script is too long and its work same in jquery ajax, So jquery ajax is easy to implement and short script and it works great.
In our web projects we apply ajax post mostly in registration form, contact form, post value, input form and getting the value of the request php file.
This tutorial is already have in the internet, but I would like to share our jquery ajax success callback function script, we’ve apply this script most applied in our web development project. In this script we add the most handle functions like html form validation, 404 connection error and Setting the timeout handler. You can preview the live demo and download the file for free.
So let’s start.
Demo

1. Creating the Page Template
index.php
<!DOCTYPE html>
<html lang="en">
<head>
<meta charset="utf-8">
<meta http-equiv="X-UA-Compatible" content="IE=edge">
<meta name="viewport" content="width=device-width, initial-scale=1">
<meta name="robots" content="noindex,nofollow"/>
<title>Creating Jquery Ajax Post Live Demo</title>
<link href="css/style.css" rel="stylesheet" type="text/css" media="all" />
<script type="text/javascript" src="https://ajax.googleapis.com/ajax/libs/jquery/3.6.0/jquery.min.js"></script>
<script type="text/javascript" src="js/script.js"></script>
</head>

<body>
<div id="wrapper">
	<img src="img/feedback.gif" alt="Feedback" />
	<br />
	<h2>Creating Jquery Ajax Post Live Demo</h2>

	<form method="post" action="" id="feedback_form">
		<table>
			<tr>
				<td class="label">Your Name:</td>
				<td class="form"><input name="name" type="text" /></td>
			</tr>

			<tr valign="top">
				<td class="label">Comments:</td>
				<td><textarea cols="30" rows="5" name="message"></textarea></td>
			</tr>
			<tr>
				<td height="20"></td>
				<td><input type="button" name="submit_now" value="Submit" /> <span class="ajax_loader"></span></td>
			</tr>
			<tr>
				<td></td>
				<td></td>
			</tr>
		</table>
	</form>

</div>
</body>
</html>
In the page template we include the stylesheet, jquery library and script. In the body we use text box and textbox like in real word web project.
2. The stylesheet
css/style.css
body  {
	font-family: verdana,helvetica,arial,sans-serif;
	font-size: 12px;
	background:#cccccc;
}
div#wrapper {
    background: none repeat scroll 0 0 #FFFFFF;
    padding: 30px;
}
.text {
	font-weight: bold;
	font-size: 16px;
}
span.ajax_loader {
	left: 8px;
    position: relative;
    top: 3px;
}
Our simple style.
3. jQuery Script
js/script.js
jQuery(function($) {

	$("form#feedback_form input[name='submit_now']").click(function() {

		var name 	= $("form#feedback_form input[name='name']").val();
		var message = $("form#feedback_form textarea[name='message']").val();

		/* simple alert validation */
		if(name == "") {
			alert('Please fill the Name field.')
			return false;
		}
		if(message == "") {
			alert('Please fill the Message box.')
			return false;
		}
		/* simple alert validation end */

		/* ajax process */

		/* option1: get data manually */
		//var datastring = 'name='+ name +'&message=+ message';

		/* option 2:  get data automatically */
		var datastring = $("form#feedback_form").serialize();

		$("span.ajax_loader").html('<img alt="" src="img/ajax-loader.gif" />'); // loading...
		$("form#feedback_form input[name='submit_now']").attr('disabled', true); // disable the submit button
		jQuery.ajax({
				type: "POST",
				url: "php/post.php",
				data: datastring,
				success: function(responseTxt) { // if no errors

					$("form#feedback_form input[name='submit_now']").attr('disabled', false); // enable the submit button
					$("span.ajax_loader").html('<img alt="" src="img/correct.png" /> Feedback Submitted.'); // success

					/* after submiited clear the form */
					$("form#feedback_form input[name='name']").val('');
					$("form#feedback_form textarea[name='message']").val('');

				},
				timeout: 15000, // timeout if 15 secs
				error: function(jqXHR, textStatus, errorThrown) { // connection error handler
					switch(textStatus) {
						case "timeout": // connection timeout handler
							//alert('Connection Timeout, Please Try Later');
							$("span.ajax_loader").html('<img alt="" src="img/invalid.png" /> Connection Timeout, Please Try Later.');
							$("form#feedback_form input[name='submit_now']").attr('disabled', false);
						break;
						case "error":
							//alert('Connection Error'); // connection 404 handler
							$("span.ajax_loader").html('<img alt="" src="img/invalid.png" /> Connection Error.');
							$("form#feedback_form input[name='submit_now']").attr('disabled', false);
						break;
						default:
							//alert(textStatus);
							$("span.ajax_loader").html('<img alt="" src="img/invalid.png" /> ' + textStatus);
							$("form#feedback_form input[name='submit_now']").attr('disabled', false);
						}
				}
		}); // ajax end

	}); // click end

}); // jquery end
In the jquery script, we use click function of course, first we put all input names in variables for simple alert validation, and have you notice the comment?
- /* option1: get data manually */
- /* option 2: get data automatically */
You can choose of this options. For option 1 method, we pass the input data variable manually, that’s why we put the input variables in the first.
For option 2 method, we use serialize function to get the value from the form automatically. I put this options for you reference. It’s up to you. Then after all we post the values via jquery ajax, and pass to success post.
4. Php Database Connection
php/database.php
<?php
	$db = mysqli_connect('localhost', 'root', '', 'axlmulat_demo');
	if(!$db) { echo mysqli_connect_error(); }
?>
First things first, in this example create database name, to connect from the database put your database credentials, MySQL host, user, password and name ‘istock_localdemos’ then create a table named ‘customer_feedback’ and fields.
Here’s the create table mysql query statement.
CREATE TABLE `customer_feedback` (
  `id` int(10) UNSIGNED NOT NULL,
  `name` varchar(50) NOT NULL,
  `message` varchar(100) NOT NULL
);
ALTER TABLE `customer_feedback`ADD PRIMARY KEY (`id`);
ALTER TABLE `customer_feedback` MODIFY `id` int(10) UNSIGNED NOT NULL AUTO_INCREMENT;
5. Ajax Request File
php/post.php
<?php
require_once("database.php"); // require the db connection
sleep(1); // loading in 1 sec

/* catch the post data from ajax */
$name 	 = trim( $_POST['name'] );
$message = trim( $_POST['message'] );

// insert query
$query = mysqli_query($db, "INSERT INTO `customer_feedback` (`name`, `message`)
						VALUES ('$name', '$message')");
	if(!$query) {
		die("Error: " . mysqli_error($db));
	}
?>
The values of serialize in script.js send to this request file via ajax post and success, after catching we use trim function per value to clear or trim the white space by typing the users and then perform the mysql insert statement.
6. Done
We’re done, we happy to share our script our jQuery Ajax Post. It is no license, you can edit the script all you want for your web projects.
Thank you for reading my tutorial. Please recommend and share
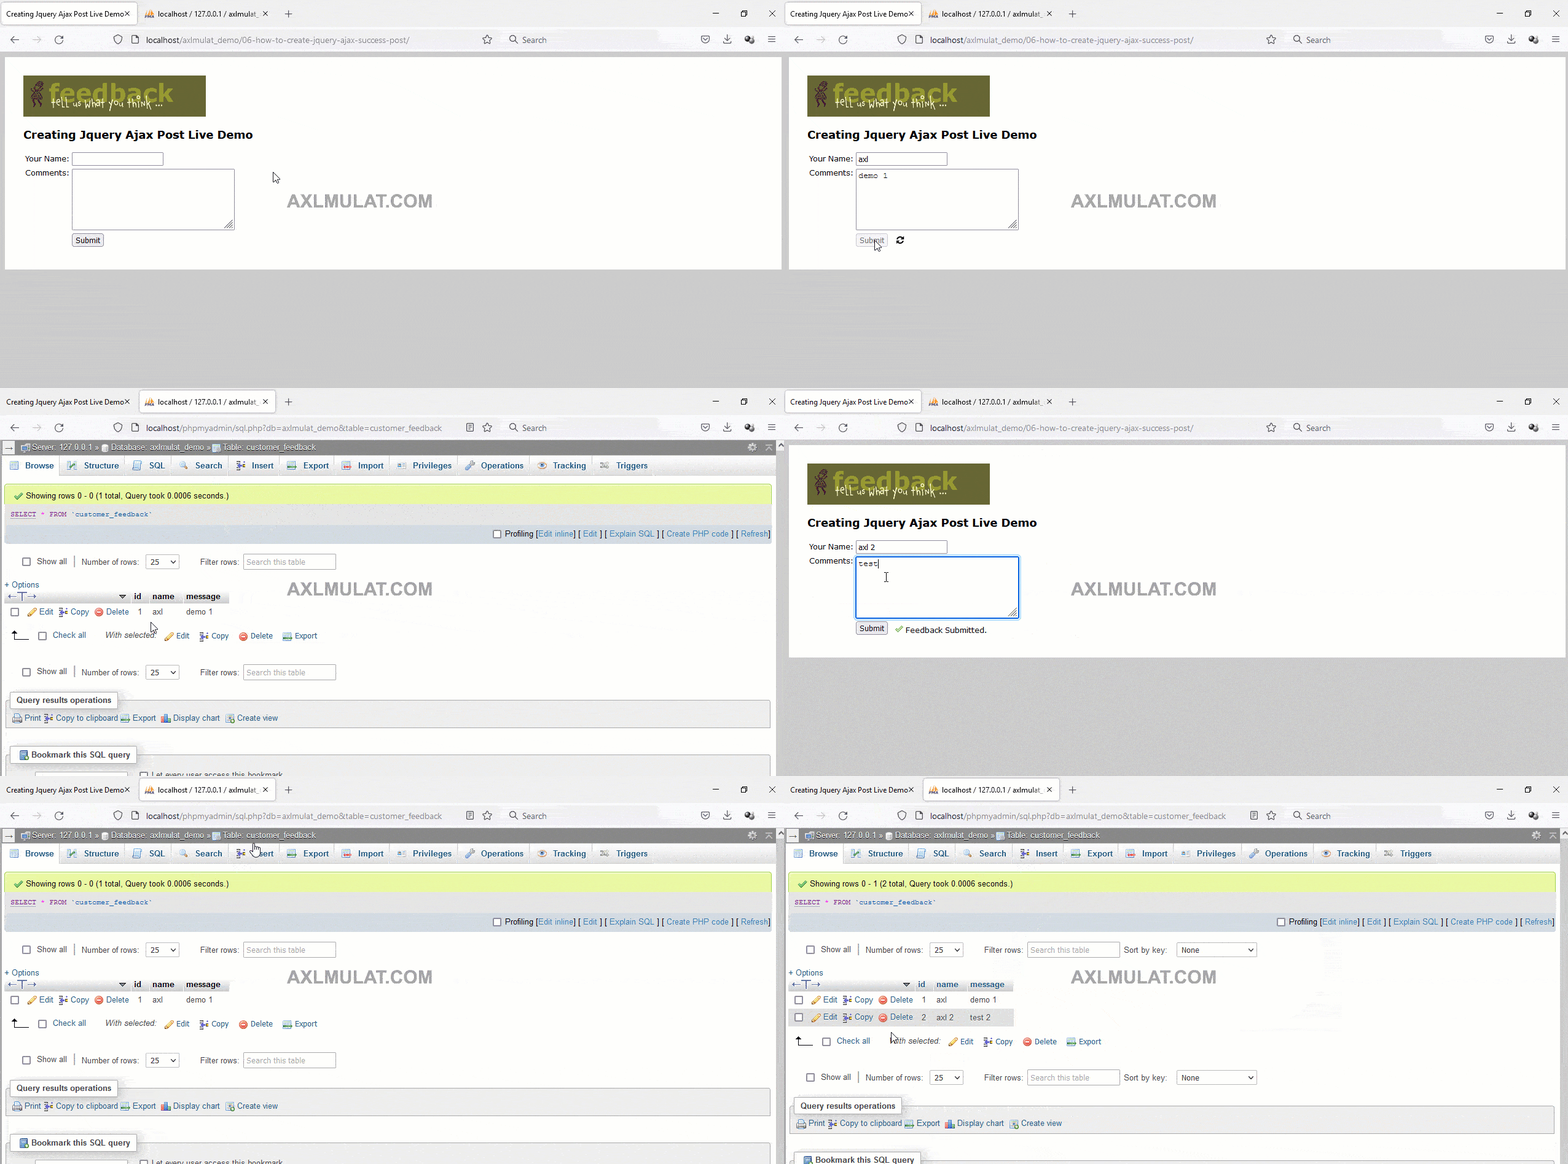
Let’s have a look at what we’ve achieved:
- Disable the submit button while processing the request and Enable back it’s done.
- Setting the timeout handler.
- Setting the 404 error handler.
